

I just have to show off the really awesome kegerator my dad and I built. To be fair, it was mostly him doing the building and me doing the designing and hooking up the hoses.
Essentially this is a standard Keezer build made out of a chest freezer. Using a temperature based relay controller, we’re able to modulate the temperature to be high enough to NOT freeze the beer. This is the temperature controller we used:

This controller will either actively heat or cool using whatever device you plug in. As shown in this photo, the blue LEDs indicate that it is set to cool. I know I know, I talked about how this actually helped us warm up the beer, but really all the chest freezer can do is cool. So the chest freezer plugs into this, this plugs into the wall. The temperature probe goes into the cooler and whenver the controller senses that the temperature in the chest freezer is ABOVE whatever limit (I have mine set to about 43 or 44), it will turn the freezer on. As soon as the probe detects the temperature has reached the set point (43 degrees Farenheit for me), it will shut off power. This lets the freezer keep the beer above freezing. Most freezers, even on the highest setting, would freeze anything in it.
Speaking of freezing beer, we had an accident one day. While working on the freezer, after I had loaded it with some beer, we removed the temperature probe and forgot to put it back in. This meant that the controller believed the temperature in the cooler was around 70 degrees, the temp of my house, and so it ran continuously for a day or two and froze everything in it. I highly recommend setting the temperature of your chest freezer up as high as possible, just in case something like this were to happen to you. It will make it easier to thaw everything later, and some beer won’t even freeze since beer typically has a lower freezing point than water. I found that my wheat beer keg froze up fairly solid, but the higher alcohol content beers in there were just fine.
ANYWAY crisis averted, the frozen beer was drank, and all was well in the world.

I had one rule that I wanted to obey above all else, and that was to not modify the freezer in a way that would make it difficult to resell on craigslist. I may decide to expand eventually… So you take the lid off of the freezer, leaving the hinges on the lid (so disconnect hinges from the body of the chest freezer). Then put a collar 2 by 4 around the freezer. We used felt on the bottom of the 2 by 4 since we had some laying around. Then you can attach the lid to the collar just above where it used to go. So, the collar uses the holes from the original hinges, and then the original hinges screw onto the collar. A hole is drilled for the gas to come into the cooler, and we mounted a 4 way manifold (splitter) on the inside. The current position of this manifold may need to change since my kegs are in there pretty tight and somewhat bumping against this manifold.
So what makes my keezer build special? The tap portion of the collar! To keep from modifying the body of the chest freezer, the drop tray sits on some screws on the collar front. This lets me remove the tray for cleaning. But best of all? The front segment of the collar can actually lift up, with all taps connected. This makes getting big awkward 5 gallon corny kegs much easier to get in and out. Not just because the lip is the original height of the freezer, but also because the taps and their connected hoses all lift up with the front of the collar. We have some shims to help stabalize it when operating the handles, but I love being able to pull this off when loading / unloading.
Other than these neat design features, the tap handles are made out of pieces of drift wood we found down at the lake at my parents’ house. Growing up on that lake, I love these handles because they look kind of rustic-y cool, but mostly because they remind me of the lake. I’m thinking if I ever named my brewery-basement I might go with Driftwood or Adrift or something along those lines.
Oh and guess what else? That tap on the left… yea it’s nitro 😉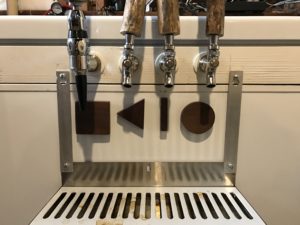
On the front of the kegerator we have attached some magnets that my dad cut out of spare wood. These magnets act as markers so that notes about each beer in my Brew Tracker app. Visitors can use the tablet that I’m going to primary leave on top of the kegerator to figure out wht beers are on tap and read a little more about them. More info on the brew tracker in another post, but here’s the pic with the markers attached. I kind of like how it resembles an old school boombox control.

